Connect Your AI Assistant
to Live Workforce Data
Connect Claude, ChatGPT, Gemini, Copilot, Cursor, or any MCP-compatible AI to TheDeskMonitor in minutes. Ask natural-language questions about your team — timesheets, clock-in status, workload alerts, productivity — and get live answers.
 Cursor
 ChatGPT
 Gemini
 Copilot
 Perplexity
Install the DeskMonitor MCP connector below, then ask your AI assistant — by typing or voice — to show you the demo company. Under 5 minutes.
Total setup time: under 5 minutes (Claude Desktop also requires Node.js v18+ — add ~5 min if not already installed). Start below — no account required.
What is MCP?
Model Context Protocol (MCP) is an open standard developed by Anthropic that lets AI assistants connect securely to external data sources and call real tools — without needing custom plugins built separately for each AI provider.
TheDeskMonitor ships a native MCP cloud server at api.thedeskmonitor.com/api/mcp/v1 with 24 live tools. Any MCP-compatible AI assistant can discover these tools automatically and answer workforce questions in natural language using your live data.
Setup takes under 5 minutes. No webhook URLs to manage. Your AI client connects directly to DeskMonitor's API over HTTPS — Claude Desktop uses mcp-remote as a local bridge (installed automatically via npx).
How Authentication Works
Two modes — try it free before creating an account, or connect to your real tenant:
dm_demo_public → explores a synthetic company (8 employees, 3 teams, 3 projects). Analytics + discovery tools active. No sign-up required.dm_live_* key. Scoped to your tenant only. Supports clock-in/out, invite staff, and all 24 tools.Data is tenant-scoped — your API key cannot access another organization's data. Employees see only their own records; managers see their team; admins see their tenant.
Get Your API Key
Use this key in any MCP client config below to explore DeskMonitor with a synthetic 8-person company. No registration, no credit card.
Your free demo key — no account needed
Sign in to TheDeskMonitor, navigate to Settings > API Keys, and generate a key. Copy the dm_live_* key — you will use it in your AI client's config below.
New to DeskMonitor? Create a free account first →
Have the DeskMonitor MCP Connector CLI installed? Click below to launch it directly with your key pre-filled. The connector auto-detects your installed MCP clients (Claude Desktop, Cursor, Windsurf, Continue and others) and writes the config for you. No manual JSON editing required.
deskmonitor:// protocol only launches the locally-installed DeskMonitor connector CLI —
it does not open a browser or send your key anywhere. Your key is passed directly to the local process.
What to Expect — Step by Step
Here is exactly what you will see at each step. Total time: under 5 minutes for Cursor, Windsurf, and Claude Code. Claude Desktop requires Node.js v18+ as a one-time prerequisite. No surprises — a consent screen will appear once when you first connect a live key.
dm_live_* key, your AI client may trigger an authorisation screen — this is normal and expected. You review the permissions and click Allow. Demo mode (dm_demo_public) skips this step.

dm_live_… value. claude_desktop_config.json
"deskmonitor": {
"command": "npx",
"args": [
"mcp-remote@latest",
"…/api/mcp/v1/",
"Bearer dm_live_…"
]
}
}
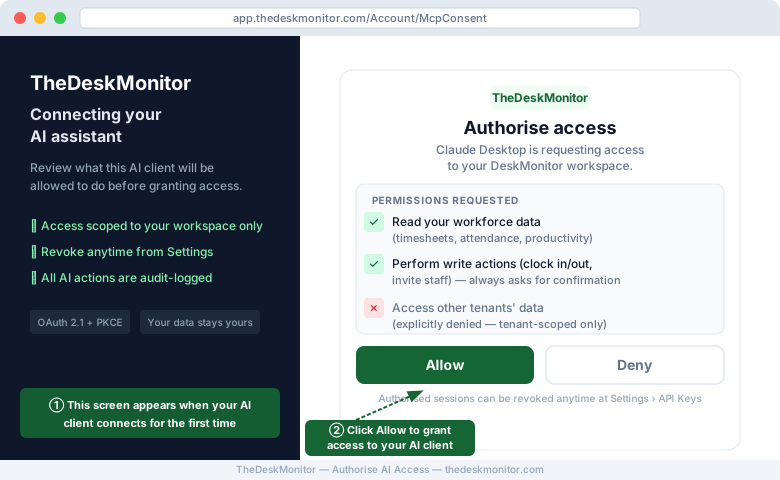
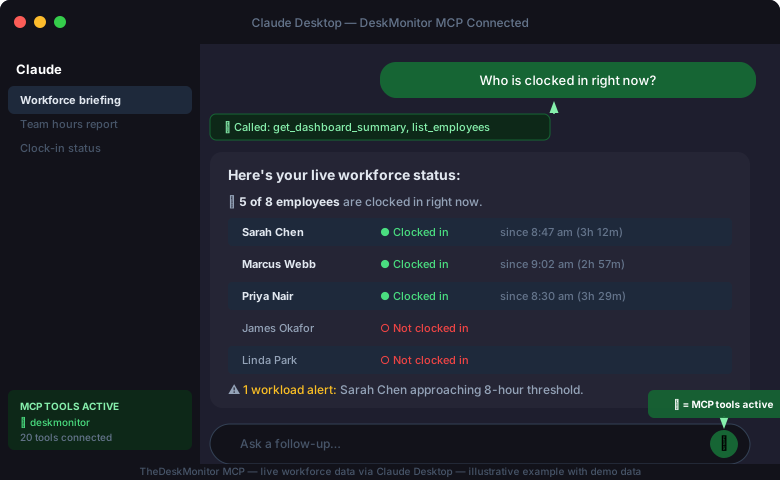
Steps A–C use only our own pages (no client-side screenshots fabricated). Step D is a client-side capture — it will appear here once recorded from a running AI client.
All data shown in Step E is from the free dm_demo_public key — illustrative only, not real employee data.
Configure Your AI Client
Select your AI assistant below and follow the numbered steps. Replace YOUR_KEY_HERE with your key from Step 1.
Claude Desktop
Live — Fully Supported Windows & macOSClaude Desktop supports MCP natively via its claude_desktop_config.json file. It is the most seamless integration — Claude discovers all 24 DeskMonitor tools automatically and uses them when you ask workforce questions.
The file location depends on your OS:
%APPDATA%\Claude\claude_desktop_config.json
# macOS
~/Library/Application Support/Claude/claude_desktop_config.json
If the file does not exist yet, create it as an empty { } JSON file.
Tip: To open this folder on Windows, press Win+R, type %APPDATA%\Claude, and press Enter.
Claude Desktop uses stdio transport and requires the mcp-remote bridge to reach a remote HTTP MCP server.
The bridge is downloaded automatically by npx — Node.js v18+ must be installed.
"mcpServers": {
"deskmonitor": {
"command": "npx",
"args": [
"-y",
"mcp-remote@latest",
"https://api.thedeskmonitor.com/api/mcp/v1/",
"--header",
"Authorization: Bearer YOUR_KEY_HERE"
]
}
}
}
Replace YOUR_KEY_HERE with dm_demo_public for demo mode, or your dm_live_* key for live data.
Why mcp-remote? Claude Desktop only supports stdio (local process) transport — it cannot connect directly to a remote HTTP MCP endpoint.
mcp-remote acts as a local stdio-to-HTTPS bridge spawned as a child process; it handles all HTTP relaying and OAuth.
Quit and reopen the Claude Desktop app. When the connection is active, you will see a tools icon (hammer) in the chat input bar, showing DeskMonitor's tools are available.
Type any of these in the Claude Desktop chat to verify the connection is working:
Claude Code
Live — Fully Supported CLI · macOS, Windows, LinuxClaude Code is Anthropic's official CLI and supports MCP servers via the claude mcp add command or the shared config file. Once added, DeskMonitor tools are available in any Claude Code session — useful for developer workflows where you want workforce context alongside code assistance.
claude mcp add deskmonitor \
--transport http \
--url https://api.thedeskmonitor.com/api/mcp/v1/ \
--header "Authorization: Bearer YOUR_KEY_HERE"
Alternatively, edit ~/.claude/claude_desktop_config.json (same format as Claude Desktop above) to add the deskmonitor entry under mcpServers.
# Should show: deskmonitor http https://api.thedeskmonitor.com/api/mcp/v1/
"Who is clocked in right now on my team?"
"Show me pending timesheet approvals."
"Clock me in." # Requires dm_live_* key
Cursor
Live — Fully Supported IDE · macOS, Windows, LinuxCursor has built-in MCP support. Once DeskMonitor is added, you can query your team's status from within the IDE — useful for developers who want workforce context without switching apps.
Click the button below to launch Cursor's built-in MCP installer. Cursor will open a dialog to confirm adding DeskMonitor — enter your API key when prompted.
YOUR_KEY_HERE in the dialog
Prefer manual setup? Follow steps 2–3 below instead.
In Cursor, press Ctrl+Shift+P (or Cmd+Shift+P on macOS) → type MCP → select Cursor Settings: Open MCP Config. This opens ~/.cursor/mcp.json.
"mcpServers": {
"deskmonitor": {
"url": "https://api.thedeskmonitor.com/api/mcp/v1/",
"transport": "http",
"headers": {
"Authorization": "Bearer YOUR_KEY_HERE"
}
}
}
}
Restart Cursor. In the Cursor Chat panel, you should see DeskMonitor listed under available tools. Ask a question like "Who is clocked in?" to verify.
ChatGPT
Beta — Custom Connectors (MCP) ChatGPT Plus / Team / EnterpriseBeta status: OpenAI is rolling out MCP support via "Custom Connectors" (ChatGPT Plus/Team/Enterprise) as of mid-2025. Availability varies by account tier and region. The steps below describe the expected configuration once MCP Custom Connectors are available in your account. Check OpenAI's Help Center for current rollout status.
In ChatGPT (web or desktop), go to Settings > Connectors (or the equivalent MCP section in your account). This option is available on ChatGPT Plus, Team, and Enterprise plans where the MCP beta has been enabled.
Select Add Connector (or Add MCP Server) and enter the following values:
URL: https://api.thedeskmonitor.com/api/mcp/v1/
Auth: Bearer Token
Token: YOUR_KEY_HERE
Start a new chat and enable the DeskMonitor connector from the tools or connectors panel. ChatGPT will call tools/list to discover all 24 DeskMonitor tools automatically.
Google Gemini
Live — MCP Supported Gemini CLIStatus: Gemini CLI MCP is live and verified — 24 DeskMonitor tools are available via gemini mcp add. Gemini Advanced (web) MCP integration is on Google's roadmap but is not yet generally available. Follow the steps below to connect Gemini CLI now.
gemini auth login
The Gemini CLI supports gemini mcp add to register an MCP server directly from the terminal — no config file editing needed:
--header "Authorization: Bearer YOUR_KEY_HERE"
Or edit ~/.gemini/settings.json manually (see step 3 below). Refer to the Gemini CLI README if the mcp add subcommand is not yet in your installed version.
~/.gemini/settings.json
"mcpServers": {
"deskmonitor": {
"url": "https://api.thedeskmonitor.com/api/mcp/v1/",
"transport": "http",
"headers": {
"Authorization": "Bearer YOUR_KEY_HERE"
}
}
}
}
> Who is clocked in on my team right now?
Gemini Advanced (web): When Google adds MCP connector support to Gemini Advanced, DeskMonitor will be compatible via the same HTTP MCP endpoint. We will publish a dedicated setup guide at that time. Contact us if you want to be notified when Gemini web support is ready.
Microsoft Copilot
Coming Soon — MCP Plugin Support Copilot for Microsoft 365 / Copilot StudioStatus: Microsoft has announced MCP support for Copilot Studio and GitHub Copilot (VS Code extension). Direct MCP connectivity for Copilot for Microsoft 365 is in development. The setup paths below describe the expected integration approach — exact steps will be confirmed when the feature reaches general availability.
GitHub Copilot in VS Code supports MCP tools in the Copilot Chat extension. Edit your VS Code settings.json or workspace .vscode/mcp.json:
{
"servers": {
"deskmonitor": {
"type": "http",
"url": "https://api.thedeskmonitor.com/api/mcp/v1/",
"headers": {
"Authorization": "Bearer YOUR_KEY_HERE"
}
}
}
}
Perplexity
Coming Soon — MCP Actions Perplexity ProStatus: Perplexity has announced MCP support for the Pro tier ("Perplexity Actions"). The feature is in phased rollout as of 2025. Once MCP Actions are available in your account, you will be able to connect DeskMonitor using the steps below.
In your Perplexity Pro account, go to Settings > Actions (or the MCP section when available). Select Add Action or Add MCP Server.
Auth Type: Bearer Token
Token: YOUR_KEY_HERE
Enable the DeskMonitor action in your search session and ask a question. Perplexity will combine live DeskMonitor data with its web search results for comprehensive answers.
Windsurf
Live — Fully Supported IDE · macOS, Windows, LinuxWindsurf (by Codeium) has built-in MCP support. Once DeskMonitor is added, you can query live workforce data from within the Windsurf IDE — useful for agentic development workflows that need team context.
Click the button below to launch Windsurf's built-in MCP installer. Windsurf will open a dialog to confirm adding DeskMonitor.
YOUR_KEY_HERE in the dialog
Prefer manual setup? Follow steps 2–3 below.
In Windsurf, press Ctrl+Shift+P (or Cmd+Shift+P) → type MCP → select Windsurf Settings: Open MCP Config. This opens ~/.codeium/windsurf/mcp_config.json.
"mcpServers": {
"deskmonitor": {
"url": "https://api.thedeskmonitor.com/api/mcp/v1/",
"transport": "http",
"headers": {
"Authorization": "Bearer YOUR_KEY_HERE"
}
}
}
}
Save the file, then reload Windsurf. DeskMonitor tools will appear in the Windsurf Cascade MCP panel.
Generic MCP Client
Live — Any MCP HTTP Client Continue.dev, Zed, custom integrationsAny MCP-compatible client that supports Streamable HTTP transport (MCP spec 2025-03-26) can connect to DeskMonitor. This includes Continue.dev, Zed editor, and any custom MCP integration you build.
Transport: Streamable HTTP (MCP spec 2025-03-26)
Auth: Authorization: Bearer YOUR_KEY_HERE
Tool discovery: GET https://api.thedeskmonitor.com/api/mcp/v1/tools
Health check: GET https://api.thedeskmonitor.com/api/mcp/v1/health
OpenAPI schema: GET https://api.thedeskmonitor.com/api/mcp/v1/openapi.json
-H "Authorization: Bearer YOUR_KEY_HERE" \
-H "Content-Type: application/json" \
-d '{"jsonrpc":"2.0","id":1,"method":"tools/call","params":{"name":"get_dashboard_summary","arguments":{}}}'
In ~/.continue/config.json, add DeskMonitor under the mcpServers array:
"mcpServers": [
{
"name": "deskmonitor",
"transport": { "type": "http", "url": "https://api.thedeskmonitor.com/api/mcp/v1/" },
"requestOptions": { "headers": { "Authorization": "Bearer YOUR_KEY_HERE" } }
}
]
}
Ask Your First Workforce Question
Once connected, try these questions in your AI client. They work with demo mode and live mode.
"Who is clocked in right now?"
This is an illustrative example using demo tenant data. Your live results will show real employee names and times.
24 Live AI Workforce Tools
Every tool below is live and callable today from any connected AI assistant. All are available in demo mode. Write tools (clock in/out, invite staff) require a live API key.
get_dashboard_summary
Dashboard KPIs — who is in, hours today, productivity, pending items
Readlist_employees
Roster with clock-in status, department, and availability
Readget_employee_details
Full profile — role, team, recent activity, hours
Readlist_my_timesheet
Your own time log entries for any date range
Readsummarize_team_hours
Aggregated team hours — per-person and totals
Readlist_pending_approvals
Timesheets awaiting manager sign-off
Readlist_recent_activity
Chronological feed — clock events, submissions, approvals
Readget_workload_alerts
Anomaly flags — overtime risk, idle, late arrival, gaps
Readget_productivity_overview
Active vs idle ratios and productivity scores
Readclock_in
Start a work session for the authenticated user
Writeclock_out
End the current work session
Writeinvite_staff
Send an email invitation to join your workspace
Writeget_capabilities
Role-scoped list of all available AI commands
Discoveryget_pricing_and_plans
Plans, features, and pricing details
Discoverystart_free_trial
Returns the sign-up URL and onboarding instructions
Discoveryget_started_guide
Onboarding guide and sample questions for first-time setup
Onboardingget_data_dictionary
Schema reference — fields, metrics, and definitions
Onboardingswitch_to_demo
Switch the AI session to synthetic demo data
Demoswitch_to_production
Return from demo mode to your real tenant context
Demoget_demo_scenarios
Guided scenario walkthroughs using demo tenant synthetic data
Demoask_workforce
Free-form open-ended workforce question routing
Readget_analytics_questions
Demand analytics — questions asked and top themes
Readget_analytics_overview
Platform-level usage stats — AI queries served, web sessions, active visitors
Readget_analytics_feature_usage
MCP tool call counts grouped by tool name
ReadFrequently Asked Questions
All third-party product names and logos (Claude, ChatGPT, Cursor, Google Gemini, Microsoft Copilot, Perplexity) are trademarks of their respective owners. Use here indicates compatibility only and does not imply endorsement or affiliation.
Your AI assistant is ready for workforce intelligence.
Connect in under 5 minutes. Try demo mode free — no account required.